Thursday, June 21, 2012
Set tabstop in VI - Mac OSX
From within VI
(Assuming you would like to use four spaces for your tabs)
:set tabstop=4
To make this behaviour the default:
user@machine:~$ cd ~
(if ~/.exrc does not exist, create it. Otherwise skip to next cmd.)
user@machine:~$ touch .exrc
user@machiner:~$ vi .exrc
Add the following line to the file:
set tabstop=4
Save and close .exrc
user@machine:~$ . .exrc
user@machine:~$ vi someTextFile.txt
Basically, if the file .exrc does not exist in your home directory create it.
Open .exrc for editing.
Add the line (w/o quotes) "set tabstop=4"
Save .exrc
Source .exrc
Test to verify function.
This should also work in most flavors of *nix.
~Fin
Wednesday, May 25, 2011
mkdir and cd to created directory with a single command - 11.04 Natty
Not a fan of having to cd to the directory you just created? You likely created it for a reason and 8 times out of 10 not need to cd to it immediately anyway. So, you do this:
Quick functional solution: Open ~/.bashrc (or .bash_profile) and add the following line:
NOTE: You can name this function whatever you like, mkdircd just makes sense to me...
Source ~/.bashrc and now let's do this the easy way:
~Fin
user@machine:~$ mkdir -p /dir/needed/to/cd/to/immediately
user@machine:~$ cd /dir/needed/to/cd/to/immediately
user@machine:~$ pwd
/home/user/dir/needed/to/cd/to/immediately
Quick functional solution: Open ~/.bashrc (or .bash_profile) and add the following line:
function mkdircd () { mkdir -p "$@" && eval cd "\"\$$#\""; }
NOTE: You can name this function whatever you like, mkdircd just makes sense to me...
Source ~/.bashrc and now let's do this the easy way:
user@machine:~$ mkdircd dir/needed/to/go/to/immediately
user@machine:~/dir/needed/to/go/to/immediately$ pwd
/home/user/dir/needed/to/go/to/immediately
~Fin
Thursday, April 14, 2011
OS X::10.6 - configure: error: C compiler cannot create executables
Ran into this trying to compile Apache Httpd:
Mac OS X solution:
Go back to: Snow Leopard DVD > Optional Installs > Xcode.mpkg:
Option: System Tools > Checked
Option: UNIX Dev Support > Checked <-- Important
Run installer. No reboot necessary. Compiler commands execute as expected.
Credit to solution author kevinx.
Original thread from discussions.apple.com: can be found here.
Configuring Apache Portable Runtime Utility library...
checking for APR-util... yes
checking for gcc... gcc
checking for C compiler default output file name...
configure: error: in `/Users/bkarels/devtools/httpd-2.2.17':
configure: error: C compiler cannot create executables
See `config.log' for more details.
Mac OS X solution:
Go back to: Snow Leopard DVD > Optional Installs > Xcode.mpkg:
Option: System Tools > Checked
Option: UNIX Dev Support > Checked <-- Important
Run installer. No reboot necessary. Compiler commands execute as expected.
Credit to solution author kevinx.
Original thread from discussions.apple.com: can be found here.
Monday, April 11, 2011
"Remote" administration of Linux VirtualBox® Guest Virtual Machines
Sometimes you just need a sandbox of your very own. Oracle's VirtualBox has long offered a way to let you play with a guest OS on your host system - but what if you need to interact with the guest from your host? In my case I wanted to simulate a sharded MongoDB cluster that, to be a true simulation, required a minimum of three servers.
Here we will go over the process of setting up your virtual machine in such a way that you can "remote" administer it and connect to it like any server on your network. For this example I will be running and OS X host with a Ubuntu Server 10.10 guest.
1. Download and install Oracle VirtualBox® here.
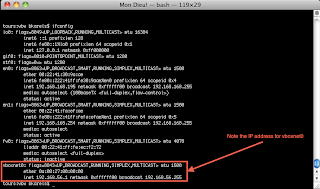
2. With VirtualBox® installed, let's take a look at our network settings on the host machine with `ifconfig`. Here you will want to take note of the vboxnet0 address:
3. Add a new virtual machine using the Oracle VM VirtualBox Manager. Once the initial setup is complete select the new virtual machine can click on the network adapter to add a second:
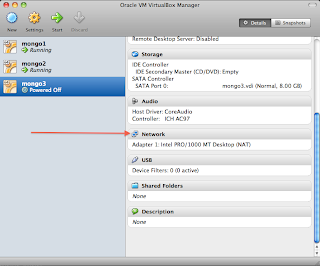
4. Adapter #1 will be configured by default and does not need to be altered. Click on the tab for `Adapter 2`, enable, and configure as follows:

5. Click the green arrow in the VM Manger to start the new virtual machine and install the new guest. (the rest of this example assumes a guest of type Ubuntu Server 10.10 but should be very similar for all flavors of *nix.)
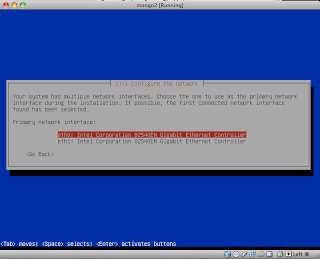
6. During the guest install be sure to select eth0 as the primary network adapter.
7. Also, to save the need to set up the OpenSSH Server later, you can elect to do so as part of the OS install.

8. Start up the new guest and login.
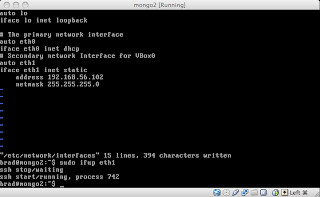
9. Configure eth1 by modifying /etc/network/interfaces Add the following lines:
(NOTE: The address below is made up from the VBoxnet0 address noted in Step 2 above. Since mine defaulted to 192.168.56.1 I was free to use any value beyond that as below.)
10. Save and close /etc/network/interfaces and bring up eth1 using:
Your terminal might look like this when done:
11. Open a terminal on your host machine and connect to your guest using SSH:
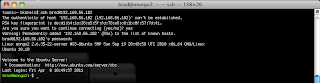
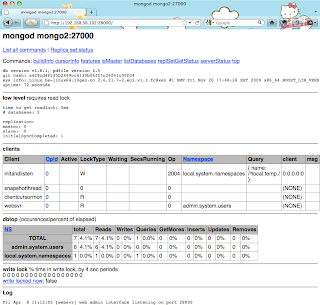
If all went well you should be connected via SSH to your guest system and be able to interact with it as you would any server on your network. So, let's fire up a remote MongoDB server on our guest and verify that we can reach the Http Interface for the instance.
Starting up mongod on port 27000 on mongo2 (Http Interface defaults to [port] + 1000 or 28000 in this case):

...and voilà! We are connected to our "remote" instance.
Fin
Here we will go over the process of setting up your virtual machine in such a way that you can "remote" administer it and connect to it like any server on your network. For this example I will be running and OS X host with a Ubuntu Server 10.10 guest.
1. Download and install Oracle VirtualBox® here.
2. With VirtualBox® installed, let's take a look at our network settings on the host machine with `ifconfig`. Here you will want to take note of the vboxnet0 address:

3. Add a new virtual machine using the Oracle VM VirtualBox Manager. Once the initial setup is complete select the new virtual machine can click on the network adapter to add a second:

4. Adapter #1 will be configured by default and does not need to be altered. Click on the tab for `Adapter 2`, enable, and configure as follows:

5. Click the green arrow in the VM Manger to start the new virtual machine and install the new guest. (the rest of this example assumes a guest of type Ubuntu Server 10.10 but should be very similar for all flavors of *nix.)
6. During the guest install be sure to select eth0 as the primary network adapter.

7. Also, to save the need to set up the OpenSSH Server later, you can elect to do so as part of the OS install.

8. Start up the new guest and login.
9. Configure eth1 by modifying /etc/network/interfaces Add the following lines:
(NOTE: The address below is made up from the VBoxnet0 address noted in Step 2 above. Since mine defaulted to 192.168.56.1 I was free to use any value beyond that as below.)
# Secondary network interface for VBox0
auto eth1
iface eth1 inet static
address 192.168.56.102
netmask 255.255.255.0
10. Save and close /etc/network/interfaces and bring up eth1 using:
sudo ifup eth1
Your terminal might look like this when done:

11. Open a terminal on your host machine and connect to your guest using SSH:

If all went well you should be connected via SSH to your guest system and be able to interact with it as you would any server on your network. So, let's fire up a remote MongoDB server on our guest and verify that we can reach the Http Interface for the instance.
Starting up mongod on port 27000 on mongo2 (Http Interface defaults to [port] + 1000 or 28000 in this case):

...and voilà! We are connected to our "remote" instance.

Fin
Thursday, March 31, 2011
Using custom shell scripts on Linux & OSX
You need to create a custom shell script and would like to run it from anywhere on your system.
1. Create a `bin` directory to store your script.
For Linux users this will create /home/[user]/bin, for OSX you'll have /Users/[user]/bin. You could name this directory whatever you'd like, but bin seems fitting.
2. Modify .bashrc or .bash_profile to put `bin` on your path.
If you're comfortable with vi you can: (Alternatively use any text editor you are comfortable with)
Either way, add the following line:
3. Save and exit.
4. Source your file for it to take effect:
5. Now you can drop a shell script into your bin directory and have executable from anywhere on your filesystem (don't forget to make it executable!)
Example:
Fin
Lift weights - Lift spirits
1. Create a `bin` directory to store your script.
machine:~ user$ mkdir ~/bin
For Linux users this will create /home/[user]/bin, for OSX you'll have /Users/[user]/bin. You could name this directory whatever you'd like, but bin seems fitting.
2. Modify .bashrc or .bash_profile to put `bin` on your path.
If you're comfortable with vi you can: (Alternatively use any text editor you are comfortable with)
machine:~ user$ vi ~/.bash_profile [OSX]
user@machine:~$ vi ~/.bashrc [Linux]
Either way, add the following line:
PATH=$PATH:$HOME/bin
3. Save and exit.
4. Source your file for it to take effect:
machine:~ user$ . ~/.bash_profile [OSX]
user@machine:~$ . ~/.bashrc [Linux]
5. Now you can drop a shell script into your bin directory and have executable from anywhere on your filesystem (don't forget to make it executable!)
Example:
Last login: Thu Mar 31 11:07:30 on ttys004
machine:~ user$ pwd
/Users/user
machine:~ user$ touch example
machine:~ user$ vi example
...
#!/bin/sh
echo "Somewhere in Russia a little girl is warming up with your max."
...
machine:~ user$ mv example ~/bin/
machine:~ user$ chmod +x ~/bin/example
machine:~ user$ ls -l ~/bin | grep example
-rwxr-xr-x 1 user staff 80 Mar 31 14:25 example
machine:~ user$ cd /tmp/
machine:tmp user$ example
Somewhere in Russia a little girl is warming up with your max.
machine:tmp user$
Fin
Lift weights - Lift spirits
Monday, March 14, 2011
Simple command line encryption
Works on OS X, Linux, anywhere with OpenSSL installed:
(NOTE: With OS X Lion breaking TrueCrypt - this is simple replacement that, in a way, simplifies things.)
To encrypt the file:
To encrypt the file stored in base64:
Other examples(notes to self...):
openssl des3 -salt -in rev27_*****_2010.zip -out rev27_*****_2010.zip.des3
openssl des3 -salt -in pf_*****_2010.zip -out pf_*****_2010.zip.des3
(NOTE: With OS X Lion breaking TrueCrypt - this is simple replacement that, in a way, simplifies things.)
To encrypt the file:
openssl des3 -salt -in infile.txt -out encryptedfile.txtTo decrypt the file:
openssl des3 -d -salt -in encryptedfile.txt -out normalfile.txtThe -a option, stores the encrypted file in base64 instead of binary.
To encrypt the file stored in base64:
openssl des3 -a -salt -in infile.txt -out encryptedfile.txtTo decrypt the file stored in base64:
openssl des3 -d -a -salt -in encryptedfile.txt -out normalfile.txtTo see a list of all available ciphers and other command information:
openssl -h
Other examples(notes to self...):
openssl des3 -salt -in rev27_*****_2010.zip -out rev27_*****_2010.zip.des3
openssl des3 -salt -in pf_*****_2010.zip -out pf_*****_2010.zip.des3
Monday, August 2, 2010
View output in console and write to file using tee - Mac OS X 10.6.4
Use tee to send output to the console and to a file:
machine:dir user$ ./some_program | tee output_file.txt
Executing the above command will display the output of some_program immediately in the console and write the same contents to output_file.txt.
I use this command mostly for diffs against svn, saves a step. Also, though I'm posting this as a Mac OS X terminal option, I first discovered this on Ubuntu 8.04 though I sure the history or this command is much older. I recall from the documentation to think of this in plumbing terms: Send your output down a pipe to a "T" essentially sending the same stream/flow to two different places.
~Fin
Subscribe to:
Posts (Atom)