Monday, January 6, 2020

Reaching New Heights according to Jonas Bonér the creator of Akka

So, not really a Linux thing in my normal vein here, but found this really thought provoking and worth sharing IMHO.  In response to the question, "What are your top tips to reach new heights in tech today?" on Twitter, Jonas Bonér (@jboner), the creator of Akka, responded as follows:
  1. Work hard at minimizing your ego & attachment to identity.
  2. Learn deliberately, seek out weaknesses & work hard at them.
  3. Eliminate bad habits, replace with good, one at a time.
  4. Read a lot, foundational stuff, not just the latest hyped thing.
  5. Allocate time for deep work, cut distractions, protect it at all costs.
  6. Improve your ability to make good decisions, learn to apply metal models, be aware of your cognitive biases, keep a decision journal.
  7. Try to always be the dumbest person in the room.
  8. Trust your intuition, if you have a great idea then most people (including yourself) will tell you it's stupid/waste of time/impossible.
  9. Don't be afraid of failure, pain is useful data, accept & recalibrate.
  10. Just do the work, how you do anything is how you do everything.
I thought this a very solid list and, after some consideration, I believe the most powerful (and most difficult) of the above is #7 - being the dumbest person in the room.  More challenging to be certain, but put in that place most of us will rise, grow, and learn more at greater speed in such a setting.

So, maybe put these in the back of your brain as we start off in 2020, go forth and be awesome!

FIN

Tuesday, December 31, 2019

A more beautiful `tree`.

We all know and love the `tree` command.  But what if we could love it just a bit more with more machine agnostic output?  In the spirit of keeping these solutions "quick", let's add the `charset` argument to our tree command and see what happens.

Normal old tree command:

Pretty, but let's step it up just a bit.

Tree with charset:


Is it cooler/better?  Up to you but I will say I prefer this output when putting together docs and other bits when you want tree output in markdown.  Better tree, plant a tree, hug a tree!

Copypastable --> $ tree --charset=ascii

FIN

Monday, August 25, 2014

Updating the default system editor - Debian

sudo update-alternatives --config editor

Then make your selection.

FIN

Friday, August 8, 2014

Resize Logical Volumes within a Volume Group (LVM2 on Debian 7)

I'll refine this later, just need to capture what I had to do this morning...

OK, I needed room on `/` to accommodate mongoDB journaling files.  I have debian 7 (Wheezy) running in a virtual machine with a separate /home partition. 

To get the space I needed I planned to take 5Gb from /home and add it to /.

So, as root, show me my Physical Volume:
root@rev0:~# pvdisplay
  --- Physical volume ---
  PV Name               /dev/sda5
  VG Name               rev0
  PV Size               89.76 GiB / not usable 2.00 MiB
  Allocatable           yes (but full)
  PE Size               4.00 MiB
  Total PE              22978
  Free PE               0
  Allocated PE          22978
  PV UUID               KBuU17-GOD4-8ckZ-EaJG-aurI-9ufl-oeUCNy
Show me my Logical Volumes at a high level using lvs:
root@rev0:~# lvs
  LV     VG   Attr     LSize  Pool Origin Data%  Move Log Copy%  Convert
  home   rev0 -wi-ao-- 77.19g                                          
  root   rev0 -wi-ao--  4.31g                                          
  swap_1 rev0 -wi-ao--  3.25g
Reduce the size of my /home LV using lvreduce (-5G = reduce by 5Gb):
NOTE: the LV path (/dev/rev0/home) can be found with the lvdisplay command which is illustrated below.)
root@rev0:~# lvreduce -L-5G /dev/rev0/home
  WARNING: Reducing active and open logical volume to 72.19 GiB
  THIS MAY DESTROY YOUR DATA (filesystem etc.)
Do you really want to reduce home? [y/n]: y
  Reducing logical volume home to 72.19 GiB
  Logical volume home successfully resized
Now add the newly available disk to root (/) using lvextend (conversely +5G here means grow by 5Gb):
 root@rev0:~# lvextend -L+5G /dev/rev0/root
  Extending logical volume root to 14.31 GiB
  Logical volume root successfully resized
GOTCHA!  Now here's what got me the first go round, the LV has now increased in size but the file system there remains at it's previous size.  So we need to grow the file system to fit the LV using resize2fs:
root@rev0:~# resize2fs /dev/rev0/root
resize2fs 1.42.5 (29-Jul-2012)
Filesystem at /dev/rev0/root is mounted on /; on-line resizing required
old_desc_blocks = 1, new_desc_blocks = 1
Performing an on-line resize of /dev/rev0/root to 3751936 (4k) blocks.
The filesystem on /dev/rev0/root is now 3751936 blocks long.
And when this is all done we can see the 5Gb shift from home to root:
root@rev0:~# lvs
  LV     VG   Attr     LSize  Pool Origin Data%  Move Log Copy%  Convert
  home   rev0 -wi-ao-- 72.19g                                          
  root   rev0 -wi-ao-- 14.31g                                          
  swap_1 rev0 -wi-ao--  3.25g
Or the more verbose:
root@rev0:~# lvdisplay
  --- Logical volume ---
  LV Path                /dev/rev0/root
  LV Name                root
  VG Name                rev0
  LV UUID                PA6izC-GU9D-eG9C-Ji9v-8avn-u7ng-dsLlPc
  LV Write Access        read/write
  LV Creation host, time rev0, 2014-08-07 07:40:00 -0500
  LV Status              available
  # open                 1
  LV Size                14.31 GiB
  Current LE             3664
  Segments               2
  Allocation             inherit
  Read ahead sectors     auto
  - currently set to     256
  Block device           254:0
  
  --- Logical volume ---
  LV Path                /dev/rev0/swap_1
  ***Swap omitted here***
  --- Logical volume ---
  LV Path                /dev/rev0/home
  LV Name                home
  VG Name                rev0
  LV UUID                0omdas-WNXb-17Sc-cfpZ-gRV0-i2G5-tHPV7L
  LV Write Access        read/write
  LV Creation host, time rev0, 2014-08-07 07:40:00 -0500
  LV Status              available
  # open                 1
  LV Size                72.19 GiB
  Current LE             18481
  Segments               1
  Allocation             inherit
  Read ahead sectors     auto
  - currently set to     256
  Block device           254:2


And now I have sufficient space on root for my journaling files.  Again, this was done fast and in a pinch, but it got the job done and may help others in a similar circumstance...

This should work for all flavors of *nix set up with LVM2.

FIN
  

Change Directory and list contents in single command.

I find myself often changing to a directory and immediately performing an `ls`. This is partly habit and partly the fluid nature nature of the files I work on.  Anyway, you don't care about that...

Using an editor of your choosing open your .bashrc or .bash_profile and add the following lines:
# User defined functions
function cdl { cd $1 && echo $PWD && ll; }
Note: In the above I have aliased `ll` as ->  alias ll='ls -ASlh'
Note: You can name this whatever you choose, I just think `cdl` made sense.
Note: You can omit the echo $PWD if you don't care to see the directory path in the output. So you could do something as simple as:
# User defined functions
function cdl { cd $1 && ls; }
Save and close and then
bkarels@rev0:~$ source ~/.bashrc
Now you can use cdl (or whatever you've named it to change directory and immediately ls the contents.

Example:
bkarels@rev0:~$ cdl foo/
/home/bkarels/foo
total 328K
-rw-------   1 bkarels bkarels 156K Aug  8 09:39 sample0
-rw-------   1 bkarels bkarels 6.9K Aug  8 08:47 someFile27
-rw-r--r--   1 bkarels bkarels 4.1K Aug  7 12:07 sayWhat
drwx------   6 bkarels bkarels 4.0K Aug  8 07:37 killWindows.exe
The above example was done on Debian 7 (Wheezy) but should work on all flavors of *nix and OSX.

FIN

Tuesday, April 1, 2014

Quick & Dirty Add User to SUDOERs (*nix)

While there is near endless and very powerful ways to configure user permissions, you've just spun up a virtual machine using VMWare or Virtual Box and you want God permissions for your user so you're not always becoming root (and then forgetting that you're root). The following example is from CentOS 6.5. Since you can destroy a system if you muck up the sudoers file just using any old text editor is not recommended. Hence, we shall use visudo.

[myuser@machine ~]$ su -
Password:
[root@machine ~]# visudo

This will open your sudoers file for editing. visudo will protect you from some, but not nearly all mistakes. So, for this quick dirty example search for the following section:
## Allow root to run any commands anywhere
root ALL=(ALL) ALL
Then, add the following directly below it:
myuser ALL=(ALL) ALL
The end result should look like:
## Allow root to run any commands anywhere
root ALL=(ALL) ALL
myuser ALL=(ALL) ALL
NOTE: The above is separated by TABS so you would type it as follows:
myuser[TAB]ALL=(ALL)[TAB]ALL

Save & close (:wq) 

[root@machine ~]# exit
[myuser@machine ~]$ sudo someCommand

FIN

Wednesday, March 5, 2014

Connect to SMB share with terminal - Fedora20

The non-gui way to connect to your SMB share. There is likely 1000 small variations of how to do this, but this is a very simple method to get you on to the path to bigger, better, cooler...

From a terminal:
[user@localhost user] $ cd /mnt
[user@localhost mnt] $ sudo mkdir shareExample
[user@localhost mnt] $ sudo mount -o username=user //theShareLocation/shareName /mnt/shareExample/
You will likely be prompted for your passwd...
[user@localhost mnt] $ cd /mnt/shareExample
[user@localhost shareExample] $ look around, do stuff...

NOTE: If you're accessing a SMB share on windows you will like need to connect using:
[user@localhost mnt]$ sudo mount -t smbfs -o username=username //theShareLocation/shareName /mnt/shareExample/

...and when you're done:
[user@localhost mnt]$ sudo umount /mnt/shareExample

This should work on all flavors of *nix, done here on Fedora20 as that is what I'm using at the moment.

FIN

Wednesday, January 16, 2013

Generate SHA hash - OSX

I'll have to clean this post up later, but just to get this down.  Pulled the new Fedora 18 XFCE spin from the torrent and needed to verify it with the provided SHA256 hash.

At it's most basic:
computer:directory user$ shasum <filename>
<some_hash> <filename>
In the case below I needed a SHA256 hash so the -a arg was necessary:


computer:directory user$ shasum -a256 <filename>
<some_256_hash> <filename>


So, here is what I did - some content removed for brevity(...):

berlin:tmp bkarels$ cat Fedora-18-x86_64-Spins-CHECKSUM
-----BEGIN PGP SIGNED MESSAGE-----
Hash: SHA256
...
95a75c...29dd6e *Fedora-18-x86_64-Live-XFCE.iso
berlin:tmp bkarels$ shasum -a256 Fedora-18-x86_64-Live-XFCE.iso
95a75c...29dd6e  Fedora-18-x86_64-Live-XFCE.iso
Checking the hash against a provided list was not as clear from the man pages.  In brief you need to use the output of a shasum as input to shasum -c.  Here you need only find 'OK' vs. relying on your human ability to visually compare hashes on a terminal.

Basic:
computer:directory user$ shasum -a 256 <filename> | shasum -c <CHECKSUM_FILE>
blah blah blah output: OK
Example:
berlin:tmp bkarels$ shasum -a 256 Fedora-18-x86_64-Live-XFCE.iso | shasum -c Fedora-18-x86_64-Spins-CHECKSUM
...
shasum: Fedora-18-x86_64-Live-Scientific-KDE.iso: No such file or directory
Fedora-18-x86_64-Live-Scientific-KDE.iso: FAILED open or read
shasum: Fedora-18-x86_64-Live-Security.iso: No such file or directory
Fedora-18-x86_64-Live-Security.iso: FAILED open or read
shasum: Fedora-18-x86_64-Live-SoaS.iso: No such file or directory
Fedora-18-x86_64-Live-SoaS.iso: FAILED open or read
Fedora-18-x86_64-Live-XFCE.iso: OKshasum: WARNING: 7 of 8 listed files could not be read
Fin.

NOTE: For clarity, here is the entire contents of the example file Fedora-18-x86_64-Spins-CHECKSUM:


berlin:tmp bkarels$ cat Fedora-18-x86_64-Spins-CHECKSUM
-----BEGIN PGP SIGNED MESSAGE-----
Hash: SHA256
3684ae2814c7e54b4f66f0411a385846533e40f107d7fff4e331c2f547951ec2 *Fedora-18-x86_64-Live-Design-suite.iso
b11da64d527e333e2160cbf5fde49f89205f932d48fa7c01690232fc1b0cacfa *Fedora-18-x86_64-Live-Electronic-Lab.iso
ea34f626488623a1f84b2041df9c65468357bfdb878f034392da16f6c9d05264 *Fedora-18-x86_64-Live-LXDE.iso
8700aa64a6485e338b3d9aa419ecadc0c87884c77203a35c6e1847147a4dca06 *Fedora-18-x86_64-Live-Robotics.iso
3bb90d115daf6f0d2279cd5a669fb265c090cb6e88125424ae960a980f9ba50d *Fedora-18-x86_64-Live-Scientific-KDE.iso
7802a1c024f9471fba90724f53c0d95045acd76c3c4346b467cb53f5608248a9 *Fedora-18-x86_64-Live-Security.iso
736e8dd36de4207fe899648299abb6b3220fd1d1bcb48b8bf712d01d2ec02bf5 *Fedora-18-x86_64-Live-SoaS.iso
95a75c334ce82b33f1a5d81eab196600e40c7933fd5f7bfa8e6ed9534529dd6e *Fedora-18-x86_64-Live-XFCE.iso
-----BEGIN PGP SIGNATURE-----
Version: GnuPG v1.4.11 (GNU/Linux)
iQIcBAEBCAAGBQJQ8FZnAAoJEP8BElzefzi9BdUQALd1dlX39NVq/GWuoR7iCrxo
+ZS5gFzp5ObdPp2+MFdKszMEI7HQnkv5Xvj7qTrUS41LwrLSAX7BN5wiuzYbD0wv
f10U7K907inViXWUbANCx/fqVDLXtC/lkRYMh0JEOyRP6VYCOjcTzby+pxfOhG3u
naAtUApx/WbydwOheyT1GJCV8e15/oXqYxDoJmQuAX7AliDyysVdtcsgDP9GEiJ+
jApOywZHdxVYzUJQlXkoYEAn9LzeOh69MEL8wP30GHGI4GBo0CMUouhXlvcnoNyj
Ov9Px/8xFSSQ6vs7rapayyaue4vCxa13Y79KKQzh+/f0G2KXgInW59Y70Q0lYkLS
SCYwNUxACSlguetDfzqTtXTAFbYUcHTcc6YLuCQGRUZbDNev/dq5pnIMLSQiDnKq
YXQd1a8qH0ZpRQCMHhRwYq6satKz1ui0PgRpAn4ScPdye8Fda9+tC5VI07SDEduX
lDvzgNgOIWA3dMgSPkcaW/jcanAB3ubgPxiyAitU12TzEPwE8RuMFlYhoIczr5pu
g1aQrw/kOng6OJGjlJWd5Sb3Qabsm3OW3hfJ7wER9TRWdDT2zwo3A+j6hYsE5og+
oLbVJhQFyqpIr9o5rhtoU3bVIyOqjl5WY+4PlTrQ+1gt1qjrY9Z0tzoSGk3ESaMi
txw7WyBRjomA/D+4jzMR
=/hTc
-----END PGP SIGNATURE-----


Thursday, June 21, 2012

Set tabstop in VI - Mac OSX


From within VI

(Assuming you would like to use four spaces for your tabs)
:set tabstop=4

To make this behaviour the default:

user@machine:~$ cd ~
(if ~/.exrc does not exist, create it.  Otherwise skip to next cmd.)
user@machine:~$ touch .exrc
user@machiner:~$ vi .exrc

Add the following line to the file:
set tabstop=4


Save and close .exrc

user@machine:~$ . .exrc
user@machine:~$ vi someTextFile.txt

Basically, if the file .exrc does not exist in your home directory create it.
Open .exrc for editing.
Add the line (w/o quotes) "set tabstop=4"
Save .exrc
Source .exrc
Test to verify function.

This should also work in most flavors of *nix.

~Fin

Wednesday, May 25, 2011

mkdir and cd to created directory with a single command - 11.04 Natty

Not a fan of having to cd to the directory you just created? You likely created it for a reason and 8 times out of 10 not need to cd to it immediately anyway. So, you do this:
user@machine:~$ mkdir -p /dir/needed/to/cd/to/immediately
user@machine:~$ cd /dir/needed/to/cd/to/immediately
user@machine:~$ pwd
/home/user/dir/needed/to/cd/to/immediately

Quick functional solution: Open ~/.bashrc (or .bash_profile) and add the following line:

function mkdircd () { mkdir -p "$@" && eval cd "\"\$$#\""; }

NOTE: You can name this function whatever you like, mkdircd just makes sense to me...

Source ~/.bashrc and now let's do this the easy way:

user@machine:~$ mkdircd dir/needed/to/go/to/immediately
user@machine:~/dir/needed/to/go/to/immediately$ pwd
/home/user/dir/needed/to/go/to/immediately

~Fin

Thursday, April 14, 2011

OS X::10.6 - configure: error: C compiler cannot create executables

Ran into this trying to compile Apache Httpd:


Configuring Apache Portable Runtime Utility library...

checking for APR-util... yes
checking for gcc... gcc
checking for C compiler default output file name...
configure: error: in `/Users/bkarels/devtools/httpd-2.2.17':
configure: error: C compiler cannot create executables
See `config.log' for more details.


Mac OS X solution:

Go back to: Snow Leopard DVD > Optional Installs > Xcode.mpkg:

Option: System Tools > Checked
Option: UNIX Dev Support > Checked <-- Important

Run installer. No reboot necessary. Compiler commands execute as expected.

Credit to solution author kevinx.
Original thread from discussions.apple.com: can be found here.

Monday, April 11, 2011

"Remote" administration of Linux VirtualBox® Guest Virtual Machines

Sometimes you just need a sandbox of your very own. Oracle's VirtualBox has long offered a way to let you play with a guest OS on your host system - but what if you need to interact with the guest from your host? In my case I wanted to simulate a sharded MongoDB cluster that, to be a true simulation, required a minimum of three servers.

Here we will go over the process of setting up your virtual machine in such a way that you can "remote" administer it and connect to it like any server on your network. For this example I will be running and OS X host with a Ubuntu Server 10.10 guest.

1. Download and install Oracle VirtualBox® here.

2. With VirtualBox® installed, let's take a look at our network settings on the host machine with `ifconfig`. Here you will want to take note of the vboxnet0 address:
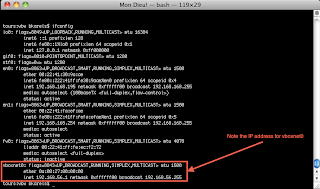


3. Add a new virtual machine using the Oracle VM VirtualBox Manager. Once the initial setup is complete select the new virtual machine can click on the network adapter to add a second:
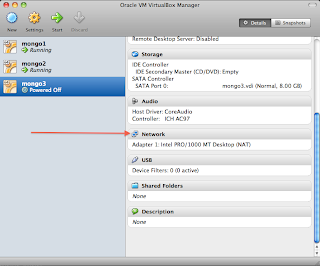


4. Adapter #1 will be configured by default and does not need to be altered. Click on the tab for `Adapter 2`, enable, and configure as follows:


5. Click the green arrow in the VM Manger to start the new virtual machine and install the new guest. (the rest of this example assumes a guest of type Ubuntu Server 10.10 but should be very similar for all flavors of *nix.)

6. During the guest install be sure to select eth0 as the primary network adapter.
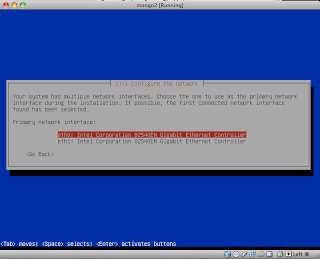


7. Also, to save the need to set up the OpenSSH Server later, you can elect to do so as part of the OS install.


8. Start up the new guest and login.

9. Configure eth1 by modifying /etc/network/interfaces Add the following lines:
(NOTE: The address below is made up from the VBoxnet0 address noted in Step 2 above. Since mine defaulted to 192.168.56.1 I was free to use any value beyond that as below.)

# Secondary network interface for VBox0
auto eth1
iface eth1 inet static
address 192.168.56.102
netmask 255.255.255.0

10. Save and close /etc/network/interfaces and bring up eth1 using:
sudo ifup eth1


Your terminal might look like this when done:
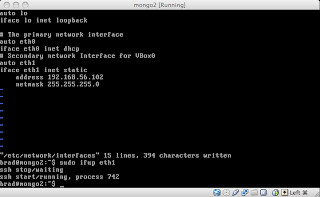


11. Open a terminal on your host machine and connect to your guest using SSH:
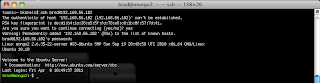


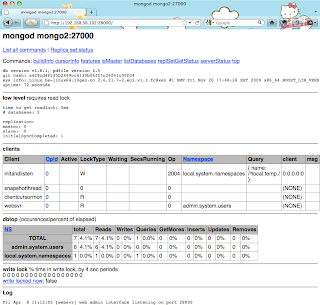
If all went well you should be connected via SSH to your guest system and be able to interact with it as you would any server on your network. So, let's fire up a remote MongoDB server on our guest and verify that we can reach the Http Interface for the instance.

Starting up mongod on port 27000 on mongo2 (Http Interface defaults to [port] + 1000 or 28000 in this case):



...and voilà! We are connected to our "remote" instance.


Fin

Thursday, March 31, 2011

Using custom shell scripts on Linux & OSX

You need to create a custom shell script and would like to run it from anywhere on your system.

1. Create a `bin` directory to store your script.
machine:~ user$ mkdir ~/bin

For Linux users this will create /home/[user]/bin, for OSX you'll have /Users/[user]/bin. You could name this directory whatever you'd like, but bin seems fitting.

2. Modify .bashrc or .bash_profile to put `bin` on your path.

If you're comfortable with vi you can: (Alternatively use any text editor you are comfortable with)

machine:~ user$ vi ~/.bash_profile [OSX]
user@machine:~$ vi ~/.bashrc [Linux]

Either way, add the following line:
PATH=$PATH:$HOME/bin

3. Save and exit.

4. Source your file for it to take effect:

machine:~ user$ . ~/.bash_profile [OSX]
user@machine:~$ . ~/.bashrc [Linux]

5. Now you can drop a shell script into your bin directory and have executable from anywhere on your filesystem (don't forget to make it executable!)

Example:

Last login: Thu Mar 31 11:07:30 on ttys004
machine:~ user$ pwd
/Users/user
machine:~ user$ touch example
machine:~ user$ vi example
...

#!/bin/sh
echo "Somewhere in Russia a little girl is warming up with your max."

...
machine:~ user$ mv example ~/bin/
machine:~ user$ chmod +x ~/bin/example
machine:~ user$ ls -l ~/bin | grep example
-rwxr-xr-x 1 user staff 80 Mar 31 14:25 example
machine:~ user$ cd /tmp/
machine:tmp user$ example
Somewhere in Russia a little girl is warming up with your max.
machine:tmp user$


Fin

Lift weights - Lift spirits

Monday, March 14, 2011

Simple command line encryption

Works on OS X, Linux, anywhere with OpenSSL installed:
(NOTE: With OS X Lion breaking TrueCrypt - this is simple replacement that, in a way, simplifies things.)

To encrypt the file:
openssl des3 -salt -in infile.txt -out encryptedfile.txt
To decrypt the file:
openssl des3 -d -salt -in encryptedfile.txt -out normalfile.txt
The -a option, stores the encrypted file in base64 instead of binary.

To encrypt the file stored in base64:
openssl des3 -a -salt -in infile.txt -out encryptedfile.txt
To decrypt the file stored in base64:
openssl des3 -d -a -salt -in encryptedfile.txt -out normalfile.txt
To see a list of all available ciphers and other command information:
openssl -h

Other examples(notes to self...):
openssl des3 -salt -in rev27_*****_2010.zip -out rev27_*****_2010.zip.des3
openssl des3 -salt -in pf_*****_2010.zip -out pf_*****_2010.zip.des3

Monday, August 2, 2010

View output in console and write to file using tee - Mac OS X 10.6.4

Use tee to send output to the console and to a file:

machine:dir user$ ./some_program | tee output_file.txt

Executing the above command will display the output of some_program immediately in the console and write the same contents to output_file.txt.

I use this command mostly for diffs against svn, saves a step. Also, though I'm posting this as a Mac OS X terminal option, I first discovered this on Ubuntu 8.04 though I sure the history or this command is much older. I recall from the documentation to think of this in plumbing terms: Send your output down a pipe to a "T" essentially sending the same stream/flow to two different places.

~Fin

Friday, January 15, 2010

Recursive SVN Directory Removal - Ubuntu 9.10 Karmic

From time to time it can be handy to remove subversion references from code that is sitting on the file system. The following command will remove all '.svn' directories from the current directory on down:

user@machine:~/dev/sample1$ rm -rf `find . -type d -name .svn`

(Please note those are grave accent quotes - below the tilde on the key left of the one(1) key.)

This command should work for all flavours of Unix.

~Fin

Tuesday, January 12, 2010

Create a symbolic link - Ubuntu 9.10 Karmic

ln -s /path/to/real/file /path/to/non-existant/file

So you could do like:

user@machine:~/devtools/jdk$ ll
drwxr-xr-x 10 root root 4096 2010-01-12 11:11 jdk-1.6.0
user@machine:~/devtools/jdk$ ln -s jdk-1.6.0/ current
user@machine:~/devtools/jdk$ ll
lrwxrwxrwx 1 brad brad 10 2010-01-12 11:25 current -> jdk-1.6.0/
drwxr-xr-x 10 root root 4096 2010-01-12 11:11 jdk-1.6.0
user@machine:~/devtools/jdk$

~Fin

Wednesday, October 28, 2009

Start, stop, restart MySql - Ubuntu 9.04 Jaunty

user@machine:~$ sudo /etc/init.d/mysql [start, stop, restart]

~Fin

Monday, October 26, 2009

Reset root password for MySql 5.* - Ubuntu 9.04 Jaunty

user@computer:~$ sudo dpkg-reconfigure mysql-server-5.0

This will pop a "dialog" in your terminal and advise you to set a root password. Verify, tab to <OK> and try logging in again:

user@computer:~$ mysql -uroot -p<password_you_just_set>
Welcome to the MySQL monitor. Commands end with ; or \g.
Your MySQL connection id is 29
Server version: 5.0.75-0ubuntu10.2 (Ubuntu)

Type 'help;' or '\h' for help. Type '\c' to clear the buffer.

mysql>


~Fin

Thursday, October 22, 2009

Using Tabs in the terminal - Ubuntu 9.04 Jaunty

Using tabs in the terminal to avoid having several terminals opens saves space and time (how did I not know about this earlier!).

Open a terminal and create a new tab using:

<shift> + <ctrl> + T

To switch between tabs using the keyboard:

<ctrl> + <page down>
(Moves one tab right - will loop through all tabs from left to right.)

<ctrl> + <page up>
(Moves one tab left - will loop through all tabs from right to left.)

~Fin